How to Use AWeber Effectively
Once you start an online business you need to start building your list and sending them your emails.
The most popular system on the market is AWeber, and its essential that you learn how to use AWeber effectively if you want to be successful in making money online.
One of the reasons why so many people are able to operate successful businesses online is due to the availability of useful online tools that do a tremendous job of automating certain business processes – like customer relations.
Keeping in touch with customers and leads is a critical task when running a business and leading email marketing service AWeber functions like a mini-customer-service relations army!
From capturing names and email addresses to providing professional quality newsletter templates, AWeber makes the smallest of companies look like the largest with automation that can be customized to reflect the uniqueness of your business and your customers.
This step-by-step illustrated guide will show you how to use AWeber and to initialize your own customer relations strategy using email

What is AWeber?
AWeber is a software program that automates the process of collecting customer lead information and communicating with those leads to support increased sales.
Access to this software is made possible through a subscription that you can purchase on a monthly, quarterly or yearly basis.
Prices start at $19 per month and increase based on the size of your list.
The Benefits of AWeber
Think about the work that would be involved if you did not have an automated service like AWeber to manage your communications with leads and customers.
You’d have to manually record the names of anyone who was interested in your business.
You then would have to collect all the names from your contact form database (or slips of paper!) and draft a letter to each to thank them for showing interest in your product or service.
You’d then have to figure out the timing for contacting each person for a follow up as that would depend on when they signed up for more information.
If you had only 2 people signing up a month that might be manageable but hopefully you want to create a thriving, profitable business and that usually requires a lot more than 2 prospects a month.
Ideally you want to be getting several prospects a day! Can you imagine how impossible it would be to create a system yourself for maintaining communications with dozens of new prospects a week?
This is why the automated email marketing service provided by AWeber is so invaluable.
With AWeber your prospects will be automatically added to a secure database that you do not have to maintain.
You also don’t have to manually respond to every new subscriber to your list. Everything is automated.
Once you set up your campaign you can then sit back and monitor the results provided to you via AWeber’s measurement reports which can tell you everything from what percentage of your list opened your email to which subscribers clicked on the links you provided within your email message.
With this kind of knowledge you can edit and adjust your email marketing strategy to better fit the interests and motivations of the people who’ve subscribed to your list.
With AWeber you can be a one-person marketing machine able to launch a professional marketing campaign using the power of email and effective communications to convert prospects into paying customers.
Setting Up Your Campaign
STEP 1:
The process of setting up your email marketing campaign in AWeber is fairly straight forward.
After you’ve registered and paid for the service you’ll be provided with login information.
Each time you wish to create a campaign you will need to log into your AWeber account.
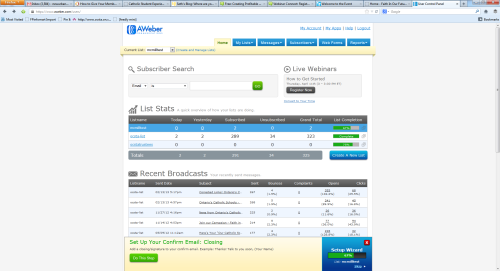
At the top left hand side of the page you’ll see a link that reads: “Create and Manage Lists” – you’ll want to click on that link.
After clicking on this link, you’ll come to a page that will list any and all lists that you currently have.
To actually create your new list you will then have to click on the bright green button at the top right hand side of the screen that says “Create New List”.
You’ll then see a screen that provides fields where you can give your list a name and a description.
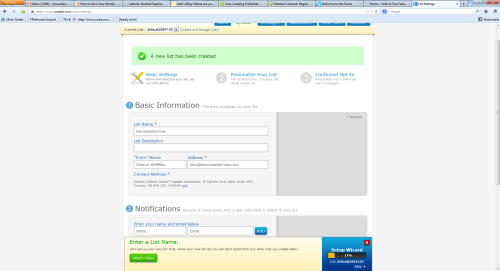
You’ll have to choose a name that is unique and not currently used by any other AWeber customer.
The system will let you know whether or not the list name you choose is available. The name must be 15 characters or less.
The description you add will be a description that your subscribers will see if they unsubscribe from your list.
AWeber also allows you to list the name and email address you want subscribers to see in the “from” field of the emails that you’ll be sending to them.
You’ll be pleased to know that your email won’t have some automated sounding return address but instead will have the name and return email address of your choice.
Under the “Contact Address” section you are required to put an address for your business or organization.
This must be a valid address and is a requirement of the CAN-SPAM Act.
The CAN-SPAM Act applies to all commercial messages and it is a law that spells out the rules for commercial email.
It also establishes requirements for commercial messages and gives recipients the right to have you stop emailing them.
It would be a good idea for you to consider using a commercial P.O. Box address (and not your personal address) in order to protect your privacy.
You’ll then be given the option of informing AWeber where you’d like to receive information about new subscribers or new unsubscribers. Enter your name and email address in those fields.
Then save your settings.
STEP 2:
You’ll then be automatically taken to a section that allows you to apply your company branding.
Before we explore the branding options let’s look at what’s happening during your set-up process.
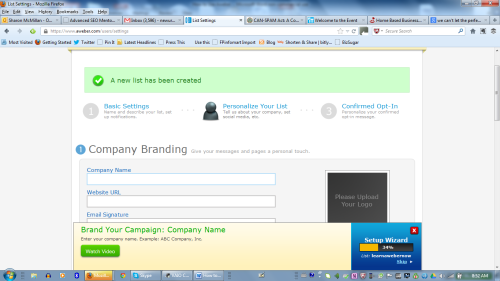
At this point you’ll notice at the bottom of the page that you’ve completed a certain percentage of your set-up tasks.
Based on the example in the image above 34% has been completed at this point.
While you have step by step guidance in this report, you can also view one of AWeber’s videos and the link will be at the bottom of the screen (see image above).
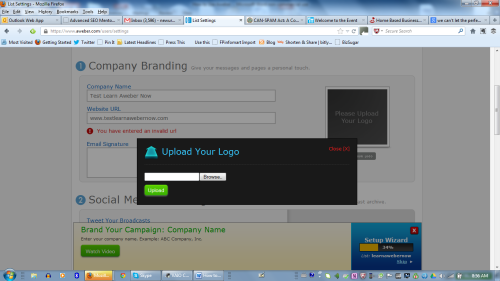
AWeber allows you to customize the pages that will be shown to your subscribers using your own logo/branding artwork.
When you click on the dark box with the text “Please Upload Your Logo” a dialogue box will open up that easily allows you to upload your image.
STEP 3:
Social media is of course a standard part of any progressive marketing initiative today and AWeber makes it easy for you to use social media to help boost your email marketing campaign.
You can connect AWeber to your social media profiles on Twitter and Facebook.
By allowing AWeber to access your profiles on these social networks, AWeber will automatically post updates (as your profile) whenever you broadcast a message to your subscribers. We’ll learn about broadcasting a little later on.
STEP 4:
One of the benefits of a using AWeber to facilitate your email communications with leads and customers is that it enables you to build a list of people who are interested in your information.
How this is achieved is by requiring new subscribers to take an active step to confirm their registration on your list.
This is initialize your own customer relt;/span>
It’s a double opt-in because your subscribers have to indicate twice that they are interested in joining your list - first when they submit their information through your web form and second when they receive your “confirmation message.”
At the top of the page you’ll see “Your Confirmation Message” this is the work screen that allows you to create the email that will be sent to your subscribers after they complete a web form that opts them into your list (we’ll talk about web forms later).
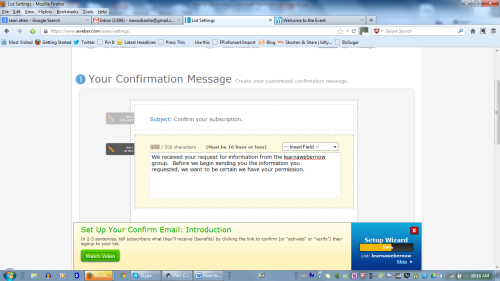
Your subscribers will receive in their inbox and email from you that says “Confirm your Subscription.”
You can edit that subject heading to something more creative or enticing if you wish.
Click on the dark “Edit Subject” box to edit the email subject area.
Determining what to say in the first paragraph of your first email to subscribers on your list can be a daunting task especially when dealing with a topic that is not about your niche but about the tool AWeber.
Not to worry – AWeber provides you with an opening introduction paragraph that can be edited – see below:
We received your request for information from the [your list/company name] group.
Before we begin sending you the information you requested, we want to be certain we have your permission.
Below this opening paragraph AWeber will provide the link that must be clicked in order for the subscriber to be confirmed. It’s not necessary to edit that section.
At the end of this email you can insert a signature that might include your name, your company name and a tagline – or really anything you choose as a closing.
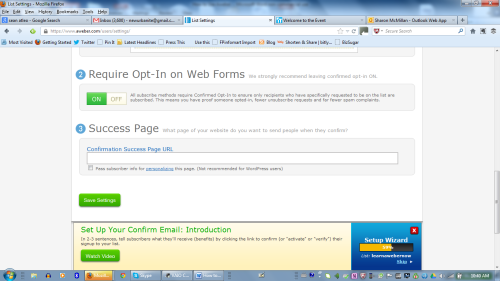
AWeber also gives you the option of having your subscribers directed to the URL/website of your choice.
If subscribers have been promised a gift (e.g. a free guide or tips sheet, etc.) you can provide the download link in the “Success Page” URL field.
At this point your list has now been set-up on AWeber.
Your next step is to create the web form that will allow visitors to your website to easily give you their contact information (ideally name and email address).
Creating Your Web Form
STEP 5:
Now that you’ve got your list set-up you can go to your AWeber navigation bar at the top of the page and click on the Web Form menu to begin creating the form that will allow visitors to your site to leave you their contact information (ideally name and email and whatever other information your strategy requires).
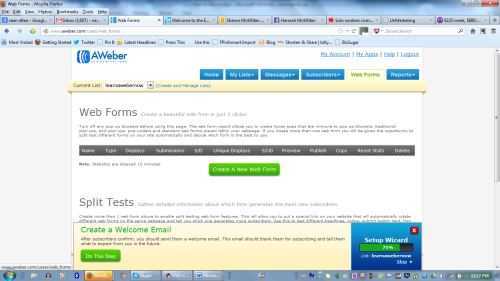
After clicking on the large green “Create New Web Form” button, a new screen will open that features various web form templates to help you design your web form.
There are 16 categories of templates that provide designs associated with various genres/niches including “corporate”, “food and wine”, “money”, “real estate” and more.
Even though these designs are pre-made, AWeber gives you some flexibility in the appearance of each template. In many instances you can customize more than text.
You can actually change the colors and graphic elements in many designs.
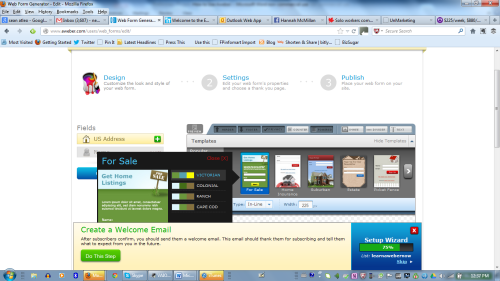
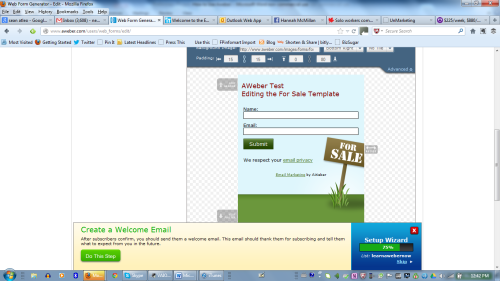
As you can see in the image above the colors used in the “For Sale Get Home Listings” form can be changed using the options presented.
In the “post-edit” image below, you’ll see the text, font color and sizing have been changed/customized.
Once you’re happy with the edits that you have made, click “Save Web Form” and then click on the blue “Go to Step 2” button.
Basic Settings for your Web Form
Step 6:
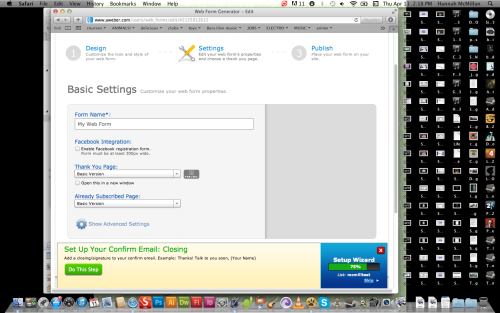
In the Basic Settings screen you can name your web form and confirm settings that will create an AWeber thank you page your subscribers will see immediately upon submitting their name, email and any other information specified on your web form.
The thank you page expresses appreciation for the subscription and notifies the subscriber that they will be receiving a confirmation email in their inbox (if you selected a double opt-in).
This message can be presented in written, audio or video format. All of these formats are prepared by AWeber.
If you so choose, you can also prepare your own custom thank you page on your own website (you will have to provide the URL to AWeber).
You’ll also be asked to choose a page that will be shown to those individuals who are already subscribers.
The template version AWeber provides is adequate but again if you wish to provide your own custom page for existing subscribers you may do so but you will have to provide AWeber with the URL to your custom page.
Publishing Your Web Form
Step 7:
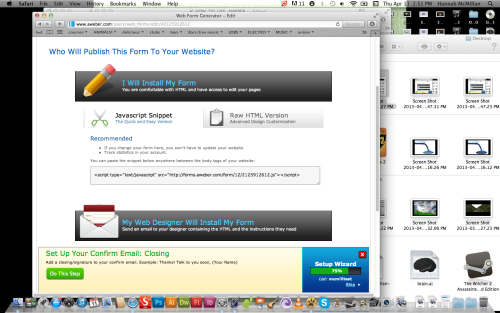
AWeber provides you with three options for publishing your web form to your website.
You can:
1. Install the form yourself.
2. Have your web designer install the form
3. Have your form hosted by AWeber
If you choose AWeber to host your form (option #3) click on that option to receive a link that will take you to your web form at a location that is hosted by AWeber (instead of your website).
You’ll have to provide this link on your website.
If you choose to have your web designer install the form (option #2) you will be asked to provide the name and email address of your designer.
AWeber will then send the HTML code for your form to that email address.
If you choose to install the web form yourself you will be provided with the java code snippet for your form (see following image).
You also have the option of securing the HTML code if you prefer.
You’ll need to copy and past the script into your website at the location where you would like to place your web form.
The Communication Part - Your Autoresponder
AWeber is essentially an email marketing system that provides you with the means to deliver automatic responses (via email) to people who sign up to be a subscriber on your list.
Now that your list is set up and your form is designed and accessible to individuals who want to become a member of your subscription list you can start creating the messages or “autoresponders” that will represent your brand and personality and will do the job of marketing your products or services.
There are two types of messages you’ll be creating on AWeber: follow-up messages and broadcast messages.
The type of message you choose depends on whether you are creating evergreen messages that are essentially standard welcome and/or informational messages about your business that rarely change or more timely and current information you issue to promote a new product or make an announcement or simply to update your list on what your business’ activities.
Creating a Follow-up Message
Step 8:
Move your mouse to AWeber’s top navigation bar and hover over “Messages”, click on “Follow-up”, then click on the green button “New HTML Message”.
It’s a good idea to make your first “Follow-up” message the welcome email you want every new subscriber to your list to receive.
You’ll want to choose an appropriate subject for your email - something like “Welcome! We’re Glad You’ve Joined Us”.
AWeber then gives you the option of choosing the option of using ready made templates that offer dozens of design options already prepared and waiting for you to customize as needed.
Click on the Templates button to select the template of your choice. If you’d rather not have any ready made designs, choose the plain template and add in only what you want (even if it is only text).
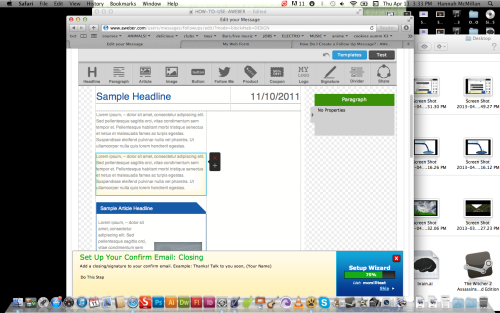
Now you’re ready for AWeber’s “block editor”. This online editor has to main components - sections and blocks.
Sections are essentially the areas in your message where you can place your content.
If you’re using a Template you’ll find that many of them already come with a number of sections already in place.
You can add to those sections by clicking the “add row” or “add column” buttons.
In addition to adding content to a section (by clicking on add row or add column buttons) you can also change the alignment of the content in that section so that they align to the top, center or bottom.
Now that we’ve covered “sections” let’s talk about “blocks.” Blocks are the actual content in your message (text, images, etc.).
You can drag and drop these blocks to move them to different parts of your page.
To begin working with blocks you need to click on that image.
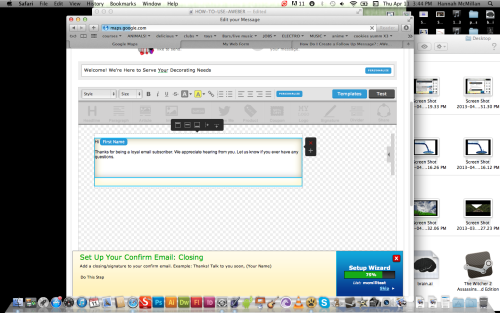
Once you click on the block you’ll see the red “x” and grey “+” signs that will either duplicate (+) or delete (x) the block of text you are currently editing/creating.
Of course one of the most important things you’ll want to do with your copy is personalize it with the name (or other types of information) provided by your subscribers.
Each message should and can appear as if it is written specifically for that individual on your list.
AWeber creates a database of your subscribers and merges the data from your subscriber list with fields that you flag for subscriber information in your message.
For example in the image above the blue area containing the phrase “First Name” would be personalized by AWeber.
Every one on your list would receive an email where they would be greeted with “Hi [subscriber’s first name]”.
If you wanted to add another personalized element to the letter you could do so by clicking on the blue “personalize” button on the editing bar.
A drop down menu would then open up on top of your copy. You would then choose the field to be inserted in that area.
In the example following this paragraph the subscriber’s email address would be inserted in the blue area highlighted as “Email Address”.

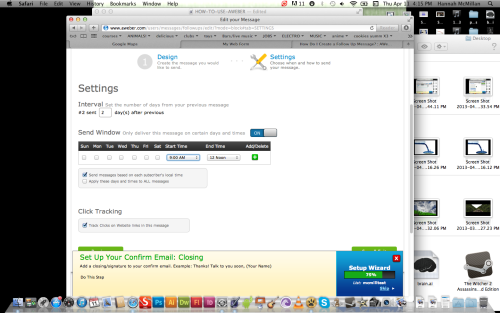
Once the email is complete you’ll need to save it.
After it is saved AWeber will ask you to determine at what interval you would like this message to be sent to subscribers.
In the following example you’ll see the settings indicate that the follow-up email created is the second email created for subscribers and it is to go out 2 days after the previous email.
So to illustrate let’s work with a scenario.
Let’s say you created a welcome message that goes out immediately after a subscriber signs up for your list.
You might then create a second email that goes out two days later that shares some interesting fact about your niche or product.
In order for AWeber to send emails in this way you would need to set the interval accordingly - as in the example above.
The second email will go out to subscribers two days after the previous email (which is email #1 - the welcome email).
These follow up emails will be sent out with this exact timing whenever a new subscriber signs up.
Important!
Unlike follow-up emails, broadcast messages go out to everyone on your list at once.
Creating a Broadcast Message
Step 9:
The broadcast message function can be accessed through the “Messages” menu on the AWeber navigation bar.
Unlike follow-up emails, broadcast messages go out to everyone on your list at once.
You still determine when (and you can schedule this for the future) but it only goes out once.
If you want a particular broadcast message to go out again, you would have to copy the message and send it again.
The thing to remember with broadcast messages is that only current subscribers will receive it.
If you send out a broadcast message in the morning and five people sign up for your list in the afternoon, those five new subscribers will not see that broadcast message.
This is why you will need to think carefully about messages and make a determination as to whether the information being shared is something every person on the list must see, or is something less essential and more a newsworthy item that might be repeated again in future messages.
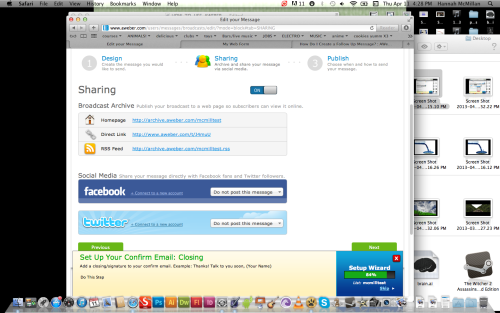
One of the benefits of broadcast messages is that AWeber allows you to publish the message or “broadcast” to various platforms including the AWeber archive page for your list, a dedicated RSS feed, and social media sites Facebook and Twitter.
There are clear directions on AWeber to allow you to broadcast your message using these various methods.
There are many ways to create a dynamic and effective email marketing strategy using the numerous tools and devices contained in the AWeber system.
This guide for how to use AWeber effectively provides you with guidance on the basic steps.
Review these steps and take the time to review the resources and references provided by AWeber to ensure you harness the full power of this exceptional technology.
More Resources
I have published a comprehensive report here with everything you need to know to get started in affiliate marketing as an online business.
Step by step instructions will help to make sure you succeed where others fail!

Below here I'm featuring more pages with helpful how-to-do-it tips on this subject.
Feel free to submit your own story or article about it, and I will create your own page here with your contribution for the community to read.
More Tips for How To Do It Yourself: Internet & IM
Do you have a tip you want to contribute here? Share it!
Read the latest updates & rest of the how-to tips here:
Click the Title links below to see the latest how to do it tips and contributions to this page...
8 Top Tips for Getting More Email List Subscribers
Many Internet entrepreneurs start out building their business on the side. They have a regular job, a busy life, lots of personal and business commitments, …
Email Campaign Manager Will Keep You On Track
When it comes to finding a good email campaign manager you can either hire an outside firm to oversee your email marketing efforts, or get someone from …
Contact Email Marketing Is Effective
When you own a business, whether online or off, you know the importance of not only staying in touch with your existing customers but constantly trying …
Email Promotion Internet Marketing
When it comes to building a profitable online business you actually have many inexpensive, yet effective, methods available to you.
One of the best …
Local Email Marketing - Ins And Outs
You will often hear people singing the praises of the internet when it comes to marketing a business. They will talk about the power to reach millions …
Business To Business Email Marketing
Email marketing is an extremely efficient and effective method of increasing your sales and your customer base, but as with so many other marketing tools, …
Broadcast Email Marketing Can Make You Or Break You
By now, you probably understand the importance of capturing your website visitors contact information using an opt in form and building a large email list …
Blast Emails - 3 Tips On Blasting E-Mails
One of the most important things you can do to improve the success of your online marketing efforts is to take the time to build an opt in email list. …
Online Business Tips - Making Contact
Before the Internet made its way into almost all of the homes in the developed world, making contact with people was a great deal more limited.
The …
Mass Email Marketing - Tips On The Right Way
Using the internet as a way to help you build your business, whether it's an online or offline business, is an extremely cost effective technique. When …
Opt In Emails Will Save Your Butt
One of the many advantages to using the internet to grow your business is the high level of automation available. No where is this automation more evident …


"Power Tips" magazine is back!
You Get A Free Complete Self Help Report delivered to your email box every edition, plus you get a free PLR article and other great gifts!
SUBSCRIBE BELOW ... I promise you will want to USE what you learn!

I really want to know what you think of this site, this page, and to hear your tips or suggestions about it.
So please share your story or simply add a Comment in the comment box.
If you feel that the information on this page has been useful to you please give it a Like or share it with your friends - thanks!!
"You are a life Saver!!
I recently discovered this site and I can tell you that my life has not been the same. I now come here EVERYDAY and spend at least 1 hour.
I used to spend that time browsing online fashion and beauty
magazine which just means that I spend more. Now I have replaced that
habit with coming here.
In future I will think about contributing articles as well. Thank you! Thank you!! Thank you!!! and God bless"

Contact Us | About Us | Terms of Use | Privacy Policy | FAQ | Testimonials
Amazon and the Amazon logo are trademarks of Amazon.com, Inc. or its affiliates. As an Amazon Associate I earn from qualifying purchases. Product prices and availability are accurate as of the date/time
indicated and are subject to change. Any price and availability
information displayed on [relevant Amazon Site(s), as applicable] at the
time of purchase will apply to the purchase of this product.
Back to HOME PAGE of this How to use AWeber effectively section of the site.
"Power Tips" is back!
Free Complete Self Help Report inside every edition, plus free PLR article and other great gifts!
SUBSCRIBE BELOW ... I promise you will want to USE what you learn!
You can subscribe to my RSS feed to get updated whenever new content is added here!
 Subscribe To This Site


Power Tips is back!
SelfHelp Report & free PLR
Free self help ezine:
You can subscribe to my RSS feed to get updated whenever new content is added here!
Subscribe To This Site
New! Comments
Have your say about what you just read! Leave me a comment in the box below.